Hive has a SQL interface via jdbc, you can thus connect to it with your usual tools (DBVis, Squirrel). I will explain here how to connect via DBVis, but the ideas are very similar when connecting with any other tool.
Create a new driver
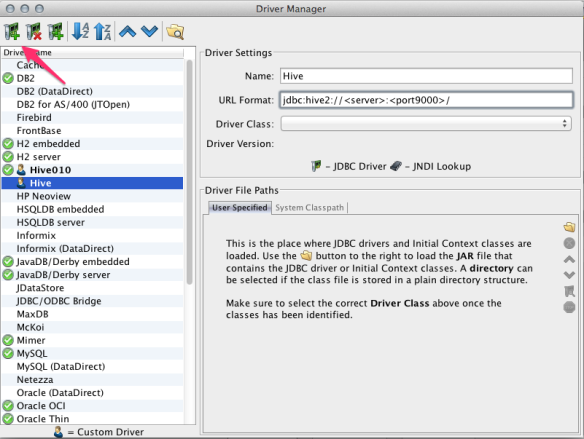
From Tool > Driver manager, click the top button with a green ‘+’ to add a driver as shown in the following screenshot.
Fill up then the ‘Name’ (this is for you only, the value can be different than the one shown below) and ‘URL format’ fields as shown.
Note that in the picture the port is 9000, usually the default hive port is 10000.
Add the relevant jars
You need to load a set of jars to be able to connect to Hive. Make sure that you use exactly the same version for hive-jdbc and hive-service as the one on your hive server. I usually take a copy of all the jars and put them in one directory, making my life easier. You can get the jars from your hive’s installation directory:
- On a Mac with homebrew, after having installed hive you can find them under /usr/local/Cellar.
- On a rpm-based linux, from the cloudera rpms (install hive) you can find them somewhere under somewhere under /usr/lib
- Directly in your downloaded folders if you get the binary version of hive from cloudera.
Note that as version number might slightly differ I do not write them in the jar names below.
- You will need:
- commons-logging.jar
- hive-jdbc.jar
- hive-service.jar
- libthrift.jar
- slf4j-api.jar
- slf4j-log4j12.jar
Click then the ‘open icon’ as shown as in the previous screenshot, and select all the jars you uncompressed in the previous step. This will fill the ‘Driver Class’ dropdown box, you need to choose ‘org.apache.hive.jdbc.HiveDriver’.
Create a new database connection
Right click on Connection, select ‘New connection’ (see 1 in the picture below.)
Fill up then the details pointed by 2 in the picture. The name is for your reference only, select the Driver name you just set up in the previous phase, and fill up the database URL as shown.
Click then connect (or reconnect if you are trying again), pointed by 3 in the picture. You should see some output as displayed in the connection message.
You are now good to go!


